

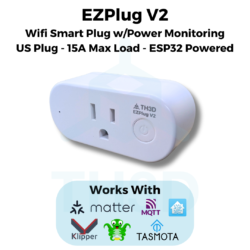
EZPlug V2 – Open Source Smart Plug with ESP32-C3, Matter Support, and Power Monitoring
$13.99
Take full control of your 3D printer, workstation, or any 120V device with the EZPlug V2—now powered by an ESP32-C3 module with Matter protocol support! Unlike other smart plugs that require sketchy apps and cloud accounts, EZPlug V2 runs open-source Tasmota firmware for 100% local control.
With integrated power monitoring, seamless integration with OctoPrint, Klipper, Matter, MQTT, and Home Assistant, and no soldering or flashing required, this is the ultimate plug-and-play smart switch for tech enthusiasts who value security, privacy, and reliability.
In stock
Usually ready in 1 hour or less - See how it works | View on Google Maps
Description
Ditch the cloud-dependent, privacy-invading smart plugs and upgrade to the EZPlug V2—the smarter, safer, and open-source way to control your devices. 🚀
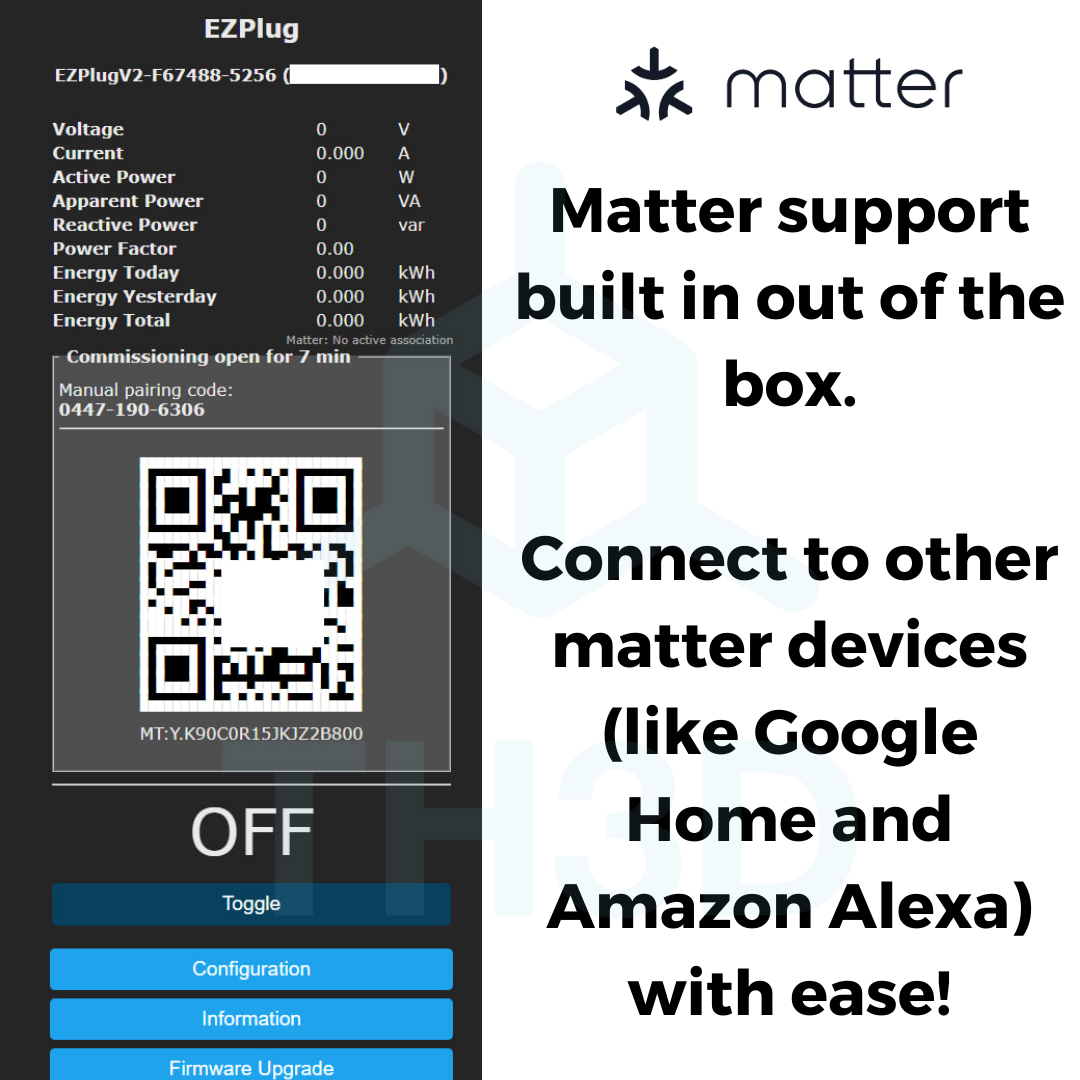
The EZPlug V2 is the next evolution of smart power control for your 3D printers and other 120V devices. Built with an ESP32-C3 module, it now supports the Matter protocol, making it even easier to integrate with modern smart home platforms while maintaining the local control and security you expect.
Unlike other smart plugs that force you into cloud-dependent apps and sketchy accounts, the EZPlug V2 ships with open-source firmware pre-installed—meaning no flashing, no soldering, and no cloud dependencies. It works seamlessly with OctoPrint, Klipper, MQTT, Home Assistant, and Matter, giving you full, privacy-focused control of your devices.
With built-in power monitoring, you can now track energy usage in real-time—perfect for those who love data-driven optimizations. Whether you need to remotely power cycle your printer, automate shutdowns for safety, or integrate into your smart home ecosystem, the EZPlug V2 makes it effortless.
Why Choose EZPlug V2?
✅ Open-Source & Locally Controlled – No cloud, no forced accounts, no privacy concerns.
✅ ESP32-C3 Powered with Matter Support – Future-proof compatibility with major home automation systems.
✅ Plug & Play Setup – No soldering, no complicated firmware flashing—just connect to WiFi and go.
✅ Full Power Monitoring – Track and analyze your energy usage in real-time.
✅ Works with OctoPrint, Klipper, MQTT, Home Assistant & More – Seamless integration for full automation control.
Technical Specifications:
- Firmware: Pre-installed EZHome (Tasmota-based) firmware.
- Wireless Connectivity: 2.4GHz WiFi (5GHz not supported), Bluetooth 5.0 LE, and Matter support.
- NOTE: While the bluetooth hardware is present in the ESP32-C3 module, Tasmota does not use it at this time and is for future use via firmware update.
- Control Protocols: OctoPrint, Klipper, Home Assistant, MQTT, and Matter.
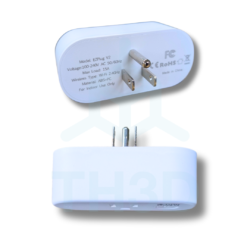
- Max Load: 15A (120V) – Suitable for 3D printers and general appliances.
- Indoor Use Only – Operating temperature: 20°F – 90°F. Complies with UL-60730-1 and CAN/CSA-E60730-1
- Recommended Protection: Use with a surge suppressor to prevent damage from power surges.
Firmware Updates & Advanced Customization:
- EZPlug V2 firmware updates are available via our EZHome releases page: Releases · th3dstudio/EZHome
- Advanced users can flash standard Tasmota firmware with the correct template, but this is at your own risk.
- Home Assistant Setup (Recommended): Use the official Home Assistant guide here – https://www.home-assistant.io/integrations/tasmota/
- Home Assistant Matter Setup Guide: TH3D Studio – EZPlug V2 Matter Setup – Home Assistant
- NOTE: When using the stock firmware (aka our EZHome branded Tasmota firmware) DO NOT USE the OTA function – it will not work and will result in improper flashing.
EZHome Firmware V4.0 is preinstalled on all plugs – Update to V4.1 to remove the OTA option from the webUI to avoid potential issues.
Warranty does NOT cover if you brick your device during any type of update. Plugs will NEVER auto-update. All updates (even OTA) must be triggered by the user.
DIY Pricing: Support Not Included
To keep our part prices as low as possible, this item does not include technical support.
Need help installing or troubleshooting?
We offer paid Priority Email Support and Live Expert Consultations starting at just $35.
Reviews (10)
10 reviews for EZPlug V2 – Open Source Smart Plug with ESP32-C3, Matter Support, and Power Monitoring
Add a review
Additional information
| Weight | 8 oz |
|---|---|
| Dimensions | 3.5 × 3 × 1.5 in |
| Made In | 🇨🇳 China |
| Warranty Length | 1 Year |
Related products


Stephen Middleton (verified owner) –
This plug is where it’s at. Safety first and then a plethora of functions/features to tinker with a link your printer up with your smart home, get notifications of power events, monitor power consumption and more!
Bill (verified owner) –
I picked up a few of these as I have several 3D printers, two at work and one at home. Thermal runaway is something that always concerned me and this adds a strong layer of protection in this respect.
I run Octoprint on all three machines and the Tasmoto plugin is as the TH3D folks say, a seamless integration.
Setup was a breeze after watching the video in the support section.
Dr Catjail (verified owner) –
I bricked my first one but that was on me, the device itself is true to its name. Its very simple to setup and it just works.
Bill (verified owner) –
I now have these installed on all three of my 3D printers and can only say good things about them. I use OctoPrint to control the printers and the ability of the Tasmota plug-in to power off the printer in the even of a thermal runaway or other printer fault gives me more peace of mind. No need to sit next to it and babysit the printer.
I added a USB power isolator to eliminate any back feed from the Pi into the printer controller and this combined with the EZPlug allows complete remote control. On prints at home when I am at work, my wife just needs to power up the Pi and I can run it remotely. She then checks on it from time to time and occasionally gets to make fun of my rare failed print.
Victor DaCosta (verified owner) –
and it was easier to setup than the app-bound brands. I love that I can control it with a webpage and that its relay still works with alexa.
Randy Clements (verified owner) –
Piece of cake, or pie, or cookie, whatever your preference. EZ is in the name, and it lives up to the hype. I have 3 or 4 other plugs from different companies. All different plugins for Home Assistant to get them recognized. Now it’s got me wondering about hacking these other plugs.
Bill Hackel (verified owner) –
Great solution to a frustrating need of mine. I love that it’s open source and LOVE that it takes care of the auto-power off of my EZPi. Thanks for offering this!!!
Jim Howard (verified owner) –
Purchased one the first time to check it out. Setup is simple and quick to do. Connected to Octoprint following their online instructions. Ended up buying two more for my other printer’s.
Raymond Knapp (verified owner) –
After contacting Tim about the lack of documentation he emailed the documentation for using Matter with home assistance. I have not done the updates but it gave me information that was not obvious to me. I want to thank Tim for the time it took him to do the documentation for the product. Everyone have a great holiday. Ray
Sheng-Yean Cheng (verified owner) –
Bought 4 of them. Set up at Apple Home was easy and fast. Got them to work almost instantly. I had a problem with one of the 4. I submitted a ticket at Th3D website. Tim responded right away. After following Tim’s instructions in checking the plug, Tim sent me a replacement right away.